

After getting a Teensy 3.1 for Christmas this year I went out to Active Electronics, a local electronics shop here in Calgary, to get some pin headers for it and it's audio shield. While there I happened across the Sparkfun Graphic LCD 84x48 which is a Nokia 5110/3110 LCD on an easy to use board. This LCD is a monochrome, on or off, unit which is controlled by a PCD8544 controller over SPI. After playing around with the example code on Sparkfun's website I was browsing Youtube to see what people have done with these displays and came across a video by Mark Feldman showing a Gamebuino. A Gamebuino is a custom device housing an Atmega328, an SD card, a battery, controls, and a 5110 LCD. In Mark's video he shows a demo of the 5110 LCD on the Gameduino showing a single shade of grey in addition to the black and white pixels. Inspired by the video and lack of information I set out to try and replicate the same effect and improve on it.
|
For my first attempt at getting a shade of grey to appear on the screen I started in the Arduino IDE with the demo code from Sparkfun's website by Jim Lindblom, and stripped all the demo code out of it to give me just a basic LCD library. In the setup function I had it do all the initialization steps and also draw a square in the middle of the screen filled in with black. Then in the loop function I wrote some code that would draw a smaller square in the middle of the larger one and update the screen, then it would overwrite and clear that smaller square and update the screen. Messing around with a delay after the clearing of the square I was able to use the persistence of the LCD to get it to appear as a shade of grey in the middle of the black square.
|
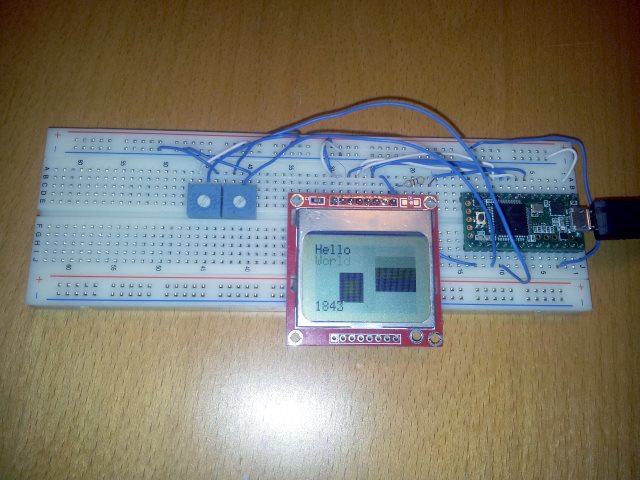
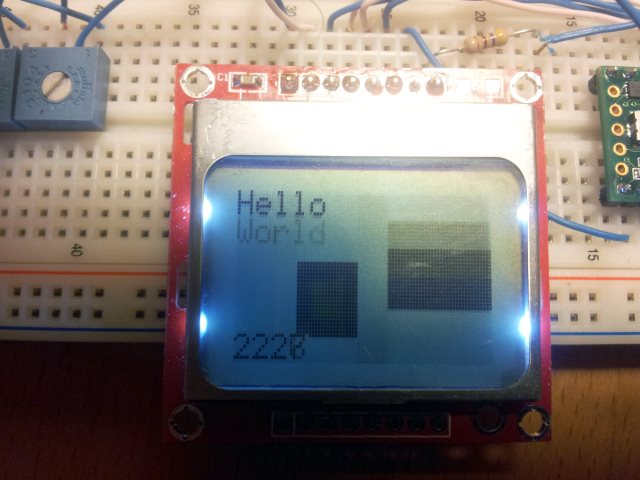
Now that I had gotten a single shade of grey to work I set out on one-upping that and getting a lighter shade of grey to appear alongside it. For the proof of concept I did a quick and dirty hack of duplicating all the library drawing functions to write to a second buffer that I could use as my second bit for my greyscale screen. I then modified the update screen function to copy to the screen four times; the first time it would set and pixels that were in either of the two buffers; the second time it would only set the pixels that were in the first buffer; the third it would only set the pixels that were set in both buffers; and finally the fourth would clear the entire screen to allow the greys to lighten a bit more. Between each of these stages I added a delay with the delay between the first and second being around 1/8th the delay between the second and third. Playing around with all the delays I was finally able to get a 4 shade "colour" bar to appear on the screen. Now that I had gotten 2-bit greyscale to appear on the display it was time to re-write it in a way that didn't involve a ton of magic numbers and using 100% of the CPU time to do so.
My first quick and dirty attempt to reduce the CPU usage before rewriting simply involved using the Timer3 library to call the updateDisplay function approximately around every 9.1ms. This somewhat worked but was not the solution I was looking for as a large amount of time was being wasted by delayMicrosecond calls in the updateDisplay function. What I settled on was a new way of writing the function which gave much more consistent and evenly spaced greys. This function had a counter that incremented each time it was called and would rollover at 4, effectively dividing my interrupt handler into 4 discreet steps. The first three steps corresponded to my function from before except they are not separated by delays but separate calls to the interrupt. In testing this I found the final step of clearing the screen was now unnecessary with the even timing so in the final state I initially did nothing but later used it to copy over the double buffer to the actual screen to prevent any odd coloured data from the buffer changing during on of the shade steps. I also modified my setup so that instead of having two discreet buffers for the 2-bit data, the second bit was stored in the byte after the first. The reason for the bits not being sequential is due to how data is sent to the 5110 LCD where you send a vertical block of 8 pixels to the display and not wanting to over-complicate writing data to the screen. I also changing the timer interval to 4ms which seemed to give the best compromise on flickering on the lightest grey shade, and corresponds to a screen update rate of 62.5hz. I also tried 4.166ms (60hz) but this resulted in noticeable bands on the image though did reduce the apparent flicker from fluorescent lights.
|
Happy that the tests were working successfully I wanted to get a 4 shade image on the display to properly see the greys besides simple line and box demos. To do this I wrote a C program that takes an 84 by 48 image exported by GIMP as a C source file and runs through it, identifies all the unique colours and prompts which shade to turn each one into. It then spits out an array of bytes than can then be directly copied into the screen buffer.
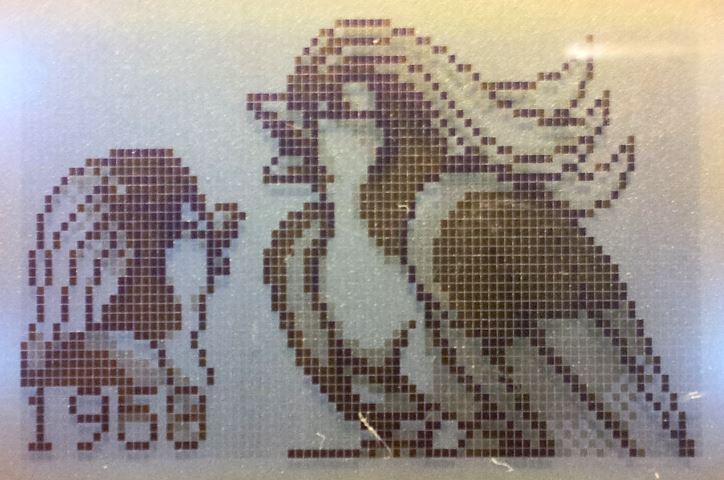
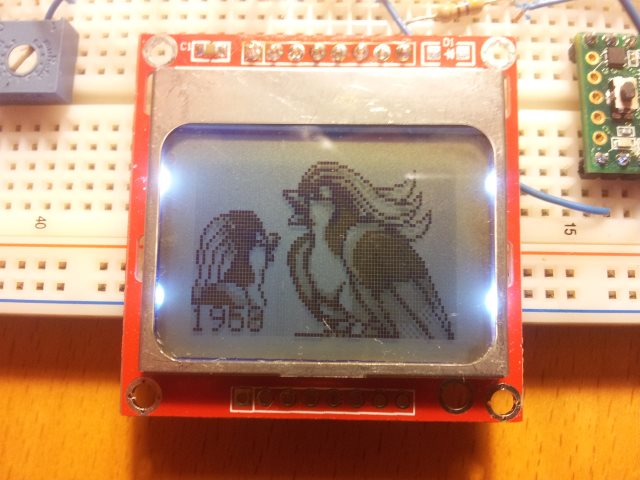
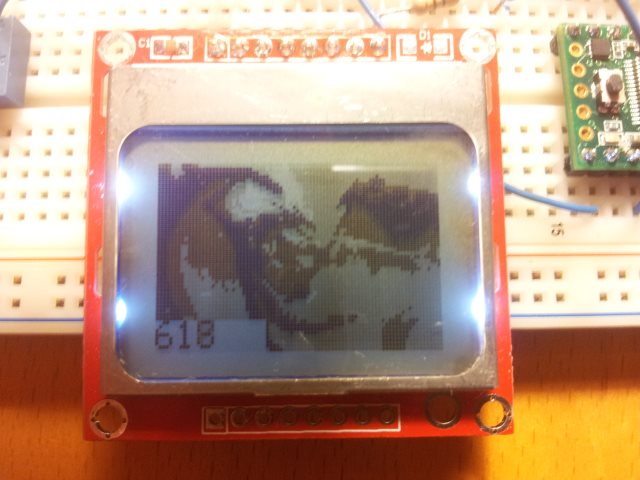
For my first test image I found a copy of the Pidgeot sprites from Pokemon Red/Blue for the original Gameboy. Since the original Gameboy only had a 2-bit greyscale screen I knew these images would work perfectly. I cropped them slightly to fit on the 5110 LCD and ran them through the program. Having that image show on the 5110 LCD really showed me that my technique worked decently. My second test image I took a wallpaper I had of a dragon breathing fire and posterized it down to 4 shades. On the 5110 LCD it didn't look too nice as the image should have much more colours, but it also showed a flaw with my light grey as it had large flat areas of light grey. On those flat areas I could see some odd moving vertical bands which I believe are related to the slightly darker than white bands you can occasionally see on white areas of this LCD next to large dark areas. You can see what I'm talking about in the middle of the image showing the colour bars and the "hello world".
|
My final test I did was to test scrolling of the 2-bit greyscale image, to do this I added a counter to the main loop which after a certain value would shift the offset into the image before being copied such that the image would scroll to the left and up by 8 pixels as it overflowed. I found that the four shades were still distinguishable up to a reasonable scroll rate for a video game, though ghosting was quite prominent as it is on older LCDs. However on a more modern monochrome LCD I feel this technique would not work as well since the lack of ghosting would make it harder to show stable shades of grey.
In conclusion I found that displaying 2-bit greyscale on a Nokia 5110 LCD module was significantly simpler than I first imagined it would be. What really aided this was the speed at which you could update the display, which I originally suspected would be too slow to do anything like this. Due to how well this worked I imagine that it could be extended to 4-bit or farther greyscale at the cost of more CPU time, but also could be optimized greatly by tightening the writing to the display, and carefully rewriting the interrupt handler.